Thursday, March 31, 2016

Couching the Curves

Couching is a stitching technique where you add a decorative element to a sewing project by laying yarn or other materials across the surface of the ground fabric and fastened it in place with stitching.

The materials can be almost anything...
the threads used for the stitching can be chosen to blend or enhance,
and the stitches used are really up to YOU!

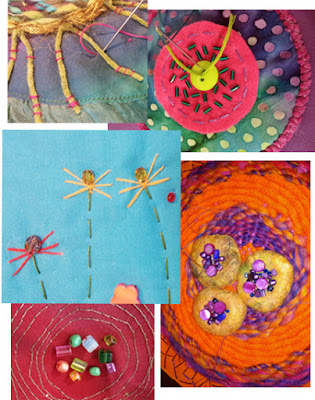
In the majority of my work I like to lay yarns down along the edges where my fabrics meet and use a wide & long zig-zag to stitch it in place.

The only limitations to be aware of is the thickness of the materials to be laid down, for something too thick, when stitched may cause bulging not lay flat.

A couple of years back I produced a tip sheet for couching, and you can click over and get a copy for yourself.
http://rosehughes.com/public_html/pdf/5-tips-for-couching.pdf

I've recently been stitching two very curvy projects, so today I wanted to share a little bit more about stitching curves and circles. Here we go!


I begin with my quilt top, batting and backing sandwich made,
and I love using spray adhesive for this step.
 the gentle curves are easy enough
if you follow the basics on the tip sheet.
 but for spirals, and other circular motifs you will want to:
1. slow down your stitching
2. keep you hand flat on the piece as it goes under the needle
3. take 4-7 stitches as the curve goes-
then with your needle down- lift the presser foot
and relieve any tension that may be starting to form the stitching.
 4. Continue stitching and relieving any
tension every few stitches as needed.
 5. When the point of the spiral is reached
(or any sharp corner)
take one additional stitch in place
and end with the needle down.

6. Pick up the presser foot.
Make the turn let the presser foot down again,
and continue stitching on.

You can see from the finished piece that the couching enhance the fabric element. It allows me to give the viewer a better idea of what is on top/ or in front of something else, and also to move the color around the piece.


Thursday, March 3, 2016

Come Along for the Ride?

In my last post I shared with you how a few of the 5-minute drawings from last year's challenge truly came in quite handy for ideas on quilts.

I have finished the one based on the flowers, and though I would love to share it; it will have to remain hidden until Quilt Market in May.

The other, that I am now calling Crossing the Ohio is coming together quite nicely -- and the updated picture here show it today as it is being couched.
The Facebook group that came together for the daily 5-minute drawing kept coming to mind while working on these projects. These drawings based on a word of the day are really valuable, so I decided to re-open the group, and take it to the next level, making words available everyday.
To do this I came up with a years worth of words, changed the name of the group on FB to Daily Creativity - 5 Minute Word Source, so starting this coming Sunday there will be posting a week of words at a time.

The Plan:

Words will be posted a week at a time.
You then can jump back in-5 minutes a day drawings.
Posting/sharing your drawings and even bigger projects that they may inspire is highly encouraged.

Afterall -- it is only 5 minutes a day, AND
In 5 minutes a day you can:
improve your drawing skills
loosen up-get your mind open for the day
increase your creativity
get your imagination stirring
and, possibly produce new concepts
Here's how it works..
Each week (Sunday) there will be a new WORDs posted on our FaceBook Group page.
That’s your queue to grab your sketchbook or some paper & a pencil.
1. Then draw anything/ everything that comes to mind when you think about the WORD.
2. STOP at 5 minutes.
3. (optional but highly desired) Snap a picture of your drawing and post it to our group page here on Facebook.

Join Us!

ps -- don't forget that my on-line workshop
F
abric'ating Embellishments starts tomorrow...
http://academyofquilting.com/class-schedule-2/online-class-details/?classesID=119